
git tutorial / cheat sheet
Using Git was a bit of a headache the first time around.
I remember day 1 complaining about it every 5 minutes. After a few days it becomes a trusted friend.
Here is the tutorial I wish I found when learning to use it.
Enjoy…and download the pdf version for the yellow highlighting which helps a lot
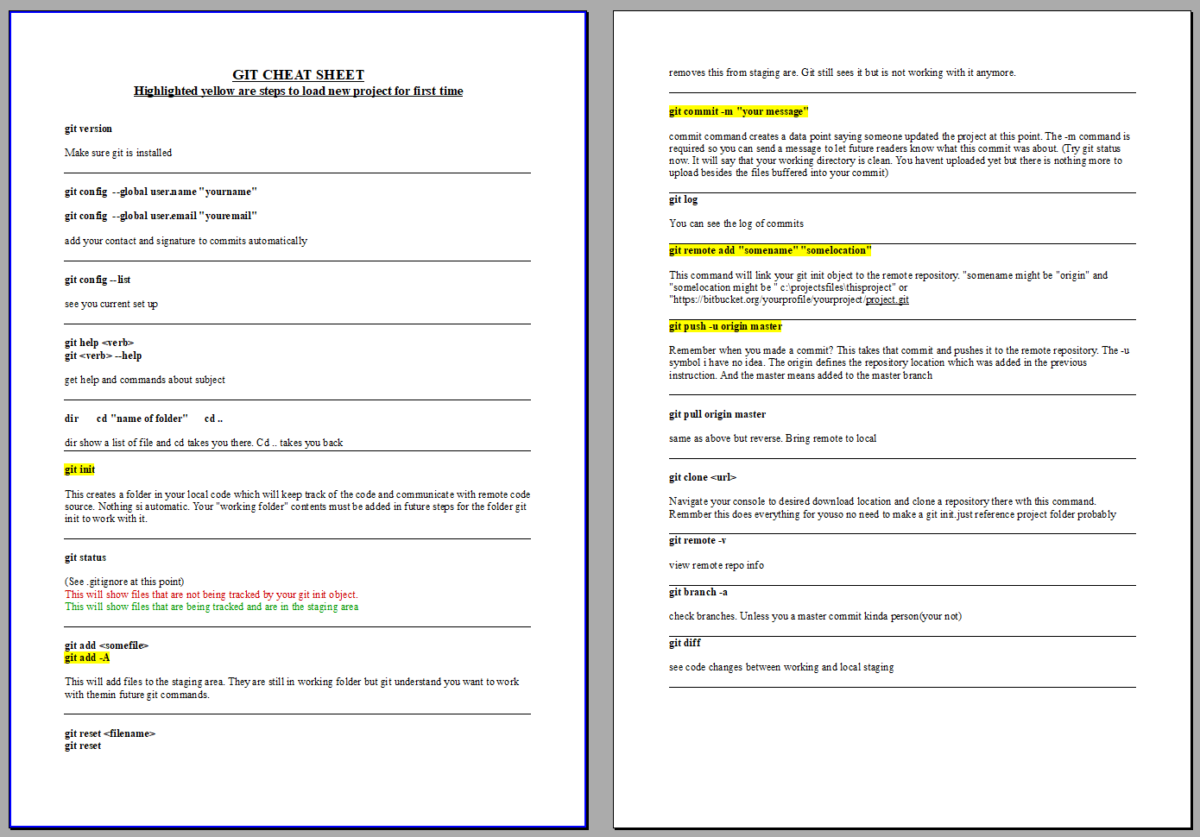
GIT CHEAT SHEET
Highlighted yellow are steps to load new project for first time
git version
Make sure git is installed
git config –global user.name “yourname”
git config –global user.email “youremail”
add your contact and signature to commits automatically
git config –list
see you current set up
git help <verb>
git <verb> –help
get help and commands about subject
dir cd “name of folder” cd ..
dir show a list of file and cd takes you there. Cd .. takes you back
git init
This creates a folder in your local code which will keep track of the code and communicate with remote code source. Nothing si automatic. Your “working folder” contents must be added in future steps for the folder git init to work with it.
git status
(See .gitignore at this point)
This will show files that are not being tracked by your git init object.
This will show files that are being tracked and are in the staging area
git add <somefile>
git add -A
This will add files to the staging area. They are still in working folder but git understand you want to work with themin future git commands.
git reset <filename>
git reset
removes this from staging are. Git still sees it but is not working with it anymore.
git commit -m “your message”
commit command creates a data point saying someone updated the project at this point. The -m command is required so you can send a message to let future readers know what this commit was about. (Try git status now. It will say that your working directory is clean. You havent uploaded yet but there is nothing more to upload besides the files buffered into your commit)
git log
You can see the log of commits
git remote add “somename” “somelocation”
This command will link your git init object to the remote repository. “somename might be “origin” and “somelocation might be ” c:projectsfilesthisproject” or “https://bitbucket.org/yourprofile/yourproject/project.git
git push -u origin master
Remember when you made a commit? This takes that commit and pushes it to the remote repository. The -u symbol i have no idea. The origin defines the repository location which was added in the previous instruction. And the master means added to the master branch
git pull origin master
same as above but reverse. Bring remote to local
git clone <url>
Navigate your console to desired download location and clone a repository there wth this command. Remmber this does everything for youso no need to make a git init.just reference project folder probably
git remote -v
view remote repo info
git branch -a
check branches. Unless you a master commit kinda person(your not)
git diff
see code changes between working and local staging
The post Git Hub Tutorial / Cheat Sheet appeared first on SignalHillTechnology.
Powered by WPeMatico